
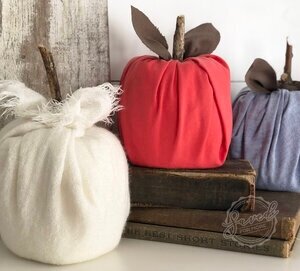
Toilet Paper Pumpkins
Supplies List
Rolls of Toilet Paper
Any Cloth Napkin or Fabric Square
Stick
Extra Fabric for Leaf
Affiliate links are included within this post for your convenience and a video tutorial is also posted below for additional help when creating your toilet paper pumpkins.
Step One
Find extra rolls of toilet paper and some pretty napkins and lets get started!!
Unroll the first part of the toilet paper and re-roll it back around the rest of the roll in a looser fashion, making the overall shape more like a pumpkin, rather than just a roll of toilet paper. This step isn’t necessary but it does make a small difference in the overall shape of your pumpkin. You can do this more or less, depending on the look you are wanting to achieve.
Step Two
Next, place the toilet paper roll in the center of the cloth napkin or piece of fabric and wrap the napkin up around the roll of toilet paper. Tuck the fabric in at the top of the roll. Fix any strange folds in the napkin, making sure it looks symmetrical and doesn’t have any square corners.
Step Three
Lastly, add a stick to the top. Choose a slightly thicker stick so that it will stay in place when placed in the center hole, where the fabric is tucked in.
If you would like to add a ‘leaf’ out of fabric, watch the video below and see how to cut the shape out. Then tie the fabric around the stick and there you go!
Super Simple and it adds a great pop of fall color and decor to any bathroom!!! We would love to see what you have been working on, so send us your pumpkin photos on any of our social media platforms.